PICTO+
How to use your own image files with our TFT luminaire

Creating your own image slots
With the Picto+ software, you can add individual images to an FL 2820 TFT. To do this, you create a new project or open an existing one. Afterwards, you create new image slots by clicking the "+" symbol. The IDs of the image slots correspond to the IDs that you will later enter in the emergency lighting unit in order to link them to functions of the system. You can store up to 168 images in one configuration.
A new image can be inserted using the "Insert image" button. You can then use the buttons on the right to set the scaling of the image, or to specify a background colour, e.g. in your corporate colours.
Creating image sequences
With PICTO+ it is not only possible to display single images on our TFT lights, but also to generate image sequences. This allows both single image animations and image sequences, e.g. between rescue signs for people with and without physical disabilities, to be displayed alternately.
Simply select a screen slot and switch from single screen to screen sequence using the button in the upper left corner. Now you can add up to 8 images in a screen sequence around the lower area. The display duration of each screen sequence can be set using the buttons at the top, and you can determine whether the screen sequence is to be played in an endless loop or whether the last screen is to remain at the end.
All other functions are the same as in the single image window. To add standard pictograms such as an escape sign for people with physical disabilities to the image sequence, use the button "Standard pictograms" and select the appropriate one from the dialog box.
Sorting and deleting image slots
If you want to change the order of the image slots or delete a certain image, you can use the button at the bottom of the left bar to sort or delete the image. A deletion by using the trashcan icon in the sidebar only removes the image sequence and/or the single image — but not the image slot itself. This is a safety function to avoid that the image slots programmed in the system are changed by mistake. In the dialog that opens, you can remove image locations as well as re-sort them.
Attention: If you use this function, you should always check whether the IDs of the PICTO+ configuration and the system configuration still display the images you want!
Export and import of a PICTO+ configuration
Do you want to import an existing configuration from a luminaire or export it to a luminaire? There are two different ways to accomplish this.
If you can connect to your luminaire via network/FTP, you can retrieve the data directly using the built-in FTP dialog. You can select "Import from network" on the start screen or via the Import button (4 f.l.) on the main screen. An FTP dialog opens, which you can use to access the luminaire.
If you do not have network access to the luminaire, you must remove the SD card from the lamp (see operating instructions for the luminaire) and import the data from the SD card using the "SD card" import dialog.
The export of the changed configuration works the same way as the process described above. You can export the configuration via the button Export, either via network or to the file directory of the SD card.
Please note: The Open and Save functions are not the same as Import/Export, because when you save a project the image references such as your logo are not yet written to the project directory. In order to use the finished configuration on the luminaire, it is imperative that you use the export function, as it copies all the images used into the project directory.
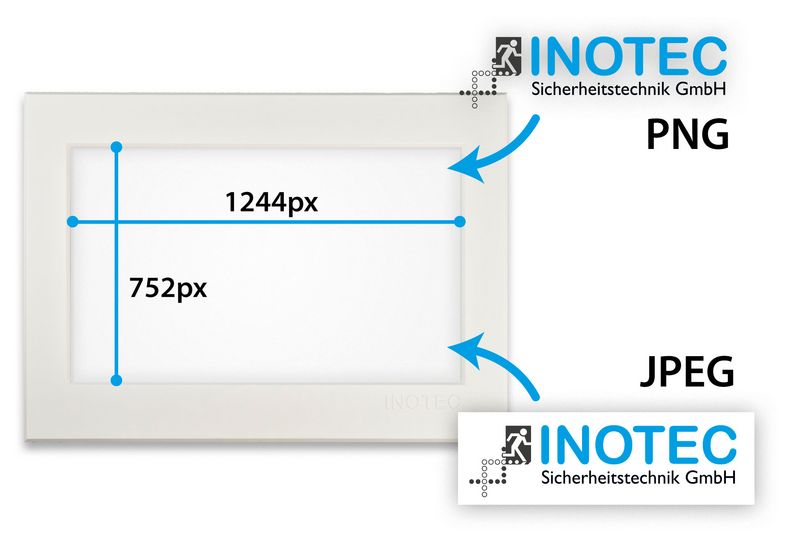
Image formats and resolution
In PICTO+ you can use JPEG files and PNG files. For example, if you want to use a logo or a graphic with a background color, the PNG format is a good choice. In PNG it is possible to save a transparent background color (alpha transparency). A JPEG on the other hand always has a solid background color.
The resolution for a full-size image on the FL 2820 TFT is 1244px in width and 752px in height.
Required software version
To be able to configure the luminaire with the Picto+ software, the luminaire requires at least software version 1.3.1. There are two ways of checking the software version of the luminaire:
Function test
If a function test is performed on the corresponding emergency lighting unit, the luminaire switches to information mode for a short time. In this state, the software version can be read off the display of the luminaire.

Konfigurator
If the luminaire is programmed to display the "INFO" pictogram in the Konfigurator and the configuration is transferred to the relevant emergency unit, the luminaire displays the information mode continuously.


Please click on the pictures to see an enlarged view.
Download PICTO+
Please enter the MAC address of your luminaire to start the software download. You can see on the picture where the address is located.
